Meat My New Best Friend

If you haven't heard by now, the Atkins/Omi 2010 Christmas plans did not quite pan out as expected. You can read about all of the details on my other blog, but this whole tragic story started a few days before we were supposed to leave when I felt the dreaded sharp pain on the right side of my stomach. Yep...appendicitis was a-brewing inside me. After my second trip to the doctor for the week, I was sent to get a CT scan. A few hours later they called and instructed me to get to the ER ASAP. I spent the night in the hospital with my good friend Morphine, and the next morning they took out my appendix.

Now you might be wondering, why is she blogging about her appendix (or lack thereof) on her food blog...? Well, I did some research about what I would be missing out on because I no longer have an appendix. Essentially the answer is nothing. Homo sapiens no longer have a use for this organ. Koala Bears, on the other hand, still need theirs to digest certain plants. Way back in the day, the appendix was used when humans had a different diet, namely, consuming raw meat. That brings me to the point of this post...it is now more important than ever for me to ensure that my meat is fully cooked. Thus, may I present to you, my new best friend...


The Polder® Deluxe Preset Meat Thermometer! I started using this when I cooked my first turkey (which I'll blog about later...I hope). It's a magical little machine that ensures your meat is fully cooked and safe to eat. The great thing about it is that you can keep it in your meat while it cooks and the alarm will go off when it reaches the desired preset temperature. I use it when I boil chicken, make a pot roast, bake frozen chicken, cook steaks, etc. It puts me at ease knowing that I will not get sick due to consuming raw or undercooked meat. For those of you who might worry about this, I'd highly recommend investing in one. They're about $30 at any kitchen goods store and very easy to use. Syonara appendix! Thanks for nothing. If you don't have a thermometer with all the bells and whistles, here's a handy guide for you to keep on hand. You'll know that your meat is ready to eat when the thermometer reads the following:
Print this chart

Read more...

Apple Crumb Pie

You didn't think I'd leave you hanging without something delicious to fill your crust with did you?? I meant to post this the day after I posted my crust recipe...but you know how that goes. This is one of the many glorious pies famous in the Omi (and now the Atkins) household.  Usually for my birthday this would be my request in place of a birthday cake. It's a huge crowd pleaser and, best of all, it's easy! Serve it ala mode for dessert, and I even like it cold for breakfast! Is that weird...? To each her own, it's good no matter how you serve it!


Ingredients
1 unbaked pie crust
8 granny smith apples, peeled, cored, sliced (these can be thin or thick slices)
1 cup sugar (divided in half)
1 Tbsp cinnamon
3/4 cup flour
1/2 cup butter (1 stick, cold)


Directions
Preheat oven to 450 degrees F.  Shape the pie crust into a pie plate.  In a gallon sized zip-loc bag, pour in 1/2 cup sugar and cinnamon. Here's the fun part...add the apples to the bag. Close tightly (very tightly) and toss the apples, coating them evenly. Mound the apples into the pie plate.
Make the crumb topping by mixing the remaining sugar, flour, and butter. (Use your food processor for best results). If the butter is melted then it just turns into a runny mess and it becomes less of an apple crumb pie. Pour this mixture evenly over the apples. 
Bake for 10 minutes at 450, then turn the oven down to 350 and cook for 50-60 minutes until the crust is golden brown and the apples are bubbly hot! See? Easy!

Print this recipe

Read more...

Pie Crust

Want to know the perfect recipe for the most delicious pie crust? Okay then, here you go! My mom is famous for a lot of things, including her scrumptious pies. Around the holidays she'll make up to 7 or 8 pies at once and we feast on them for days! Pecan, pumpkin, chocolate, lemon meringue, apple, cherry, etc. Whenever she did that, her daughters turned into pie elves, and I was usually assigned to the pie crust station. This is not to say that I've perfected the recipe, but I've had lots of practice. The one thing she emphasized time and time again: DO NOT OVER MIX. This recipe is very simple, and makes a delicious, flaky crust...unless it is over mixed. Then it just crumbles once it is baked and you've put in all that hard work for nothing. Just give it a shot, and see if you ever buy those pre-made crusts again...


Ingredients
1 3/4 cup plain flour
1/2 cup mazzola corn oil
1/2 tsp salt
3 Tbsp cold water

Directions
Put flour in a bowl and mix in salt. Make a well in the center of the flour. Pour the water and oil into the well.
With a fork, pull flour into the oil mixture.  Stir just about 10 times. Do not over mix. Make a ball with the dough. (There will still be some unmixed flour). 

Put on floured wax paper and cover with wax paper. Roll out with rolling pin in a circle shape. Again, try not to overwork it. Peel off wax paper, lift bottom sheet, and put crust into pie plate. Shape. Add filling. 
  
Print this recipe

Read more...

Roy's Lasagna

Does lasagna make anyone else think of Garfield...? Or is it just me?  Well either way, making lasagna has always intimidated me, even though I love to eat it! And I'm not a big fan of the huge frozen dishes that take 3 hours to bake, but are still cold in the middle no matter what. So I finally opened my cook book and conquered my fear.  It's officially called 1981 Roy's Lasagna.  My mom knows who Roy is...but I don't, (I was born in '86...maybe that has something to do with it). All I know is that he has one heck of a lasagna recipe. As always, I made the whole recipe (which could feed a hungry family of 6) and so I still have some in the freezer for another time.


Meat Filling:
4 Tbsp oil
1 Tbsp finely chopped garlic
1 lg onion chopped
1 3/4 lb ground chuck
1 lb sausage
1 tsp oregano
1 tsp basil
1 bay leaf
2 tsp sugar
salt to taste
15 oz tomato sauce
28 oz plum tomatoes
6 oz tomato paste
1 cup water
 Saute onion and garlic in oil.  Add meat and remaining ingredients.
 Simmer for 1 hour, stirring occasionally...yummm


Cheese Filling:
2 cartons of ricotta cheese
1 1/4 tsp salt
3/4 tsp pepper
1 egg
1/2 c finely chopped fresh parsley
1/2 cup parmesan cheese
Combine these ingredients and mix well.

And finally:
1 lb lasagna noodles cooked until just tender
16 oz mozzarella cheese, grated
Layer in pan starting with some sauce, noodles, filling and cheese. Repeat ending with cheese.
Cover with foil bake in preheated oven at 350 F for 25 min
Remove foil and bake uncovered for another 25 min.

Pictures taken by helpful hunny/sieu chef. He recently got his new baby named 7D and he is the best videographer around. He's not bad at taking stills either, and he makes my blog much happier. :-D


Print this recipe

Read more...

Enchiladas Verdes

There is one requirement for this recipe. You must say the name with a nice, suave, Spanish accent...go ahead..."Enchiladas Verdes!".  This is another one Elise and I made when she came to visit. We spent the better half of our day putting this dish together, but it was well worth it! I got the recipe from my America's Test Kitchen book. If you don't know much about ATK, it is great for someone learning how to cook because first, they travel the country to find the best recipes for a particular dish, and then they give detailed instructions on how to make it. So without further ado, here is the recipe that they found (and some entertaining pictures of our attempt to make it).

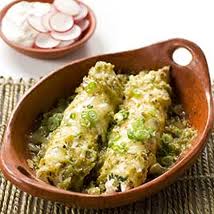
This is the picture from my cook book...as soon as we saw it, we were off to the grocery store to buy some tomatillos!


Ingredients
4 tsp vegetable oil
1 medium onion, chopped (1 cup)
3 medium garlic cloves, minced or pressed through garlic press (about 1 tablespoon)
1/2 tsp ground cumin
1 1/2 cups low-sodium chicken broth
1 pound boneless, skinless chicken breasts (2-3 breasts), trimmed of excess fat
1 1/2 pounds tomatillos (16-20 medium), husks removed, rinsed well and dried
(look for pale green tomatillos that fill and split open the fruit's outer papery husk)
3 medium poblano chiles, halved lengthwise, stemmed and seeded
1 - 2 1/2  tsp sugar
Salt 
Ground black pepper
1/2 cup coarsely chopped fresh cilantro leaves 
8 ounces pepper Jack or Monterey Jack cheese, grated (2 cups)
12-15 (6-inch) corn tortillas 

Garnish
2 medium scallions, sliced thin
Sour cream


Directions
1. Adjust the oven racks to the middle and highest position and turn the broiler on. Now, poach the chicken (which is just a funny way of saying, 'cook in a flavored broth').

Heat 2 tsp of the oil in medium saucepan over medium heat until simmering; add the onion and cook, stirring frequently, until golden, 6-8 minutes. Add 2 tsp of garlic and the cumin. Cook and stir for about 30 seconds. Decrease the heat to low and stir in chicken broth. Add the chicken (raw), cover, and simmer until an instant read thermometer reads 160 degrees (15-20) minutes, flipping half way through. Transfer the chicken to a large bowl; place in the refrigerator to cool, about 20 minutes.  Remove 1/4 cup liquid from the saucepan and set aside; discard the remaining liquid.
 2. Meanwhile, toss the tomatillos and poblanos with the remaining 2 teaspoons oil; arrange on a rimmed baking sheet lined with foil, with the poblanos skin side up. Broil until the vegetables blacken and start to soften, 5-10 minutes, rotate the pan halfway through cooking. Cool for 10 minutes, then remove the skin from the poblanos (leave the tomatillo skin intact). Put them all into a food processor.  Set the oven to 350 degrees. Discard the foil from the baking sheet and set the baking sheet aside for warm the tortillas.

3. Add 1 teaspoon of sugar, 1 teaspoon salt, the remaining teaspoon garlic, and the reserved 1/4 cup cooking liquid to the food processor. Pulse until the sauce is somewhat chunky, about eight 1-second pulses. Taste the sauce; season with salt and pepper and adjust tartness by stirring in the remaining sugar, 1/2 teaspoon at a time. Voila, you have made green chile! You should have about 3 cups. (note: we added some jalepenos because it needed some spice).


4. When the chicken is cool, pull into shreds using your hands or 2 forks, then chop into small bite-sized pieces. Combine the chicken with the cilantro and 1 1/2 cups of the cheese; season with salt.

5. Smear the bottom of a 9x13 inch baking dish with 3/4 cup of the tomatillo sauce. Place the tortillas on 2 baking sheets. Spraying both sides of the tortillas lightly with Pam. Bake until the tortillas are soft and pliable, 2-4 minutes. Increase the oven temperature to 450 degrees. Place the warm tortillas on a clean countertop and spread 1/3 cup filling down the center of each tortilla. Roll each tortilla tightly and place in the baking dish, seam side down. Pour the remaining tomatillo sauce over the top of the enchiladas. Use the back of a spoon to spread the sauce so that it coats the top of each tortilla. Sprinkle with the remaining 1/2 cup cheese and cover the baking dish with foil.


6. Bake the enchiladas on the middle rack until heated through and the cheese is melted, 15-20 minutes. Uncover, sprinkle with scallions, and serve immediately.


Print this recipe

Read more...

Chicken Tortilla Soup

This is a recipe I made a while ago (a couple of times) but thought it was appropriate as fall is now upon us and it's time to start making some warm comfort food. A long-time friend, whom we like to call Ms. Shelly, offered this recipe for my cook book. It's a bit spicy for me, so I just cut back on the jalapenos and top with plenty of cheese, sour cream and avocados!  Of course, the best part about it is that it makes plenty. I like to make the whole recipe and then divide it into freezer bags and store it for a later time. The key is to freeze it laying down, it will take up less room in your freezer.


Ingredients
1 Tbsp olive oil
1 large onion, diced
2 Tbsp minced garlic
3 cups chicken (or leftover turkey!)
2 cans diced tomatoes (Rotel has a type with chilies already in it)
4 cans diced green chilies (or less)
1 can diced jalapenos
1/2 tsp ground cumin
1/2 tsp chili powder (or less)
1/2 tsp salt
1/2 tsp pepper
3 cans chicken broth (adjust this amount if you like a stew vs. soup)
1 can corn
1 can black beans
1/2 bunch cilantro, chopped
2 tsp lime juice

Directions
1) Brown the garlic and onion with oil in a large stock pot or Dutch oven
2) Add chicken and continue to brown. Keep on eye on it so it doesn't burn! Add the tomatoes and chilies. Add the spices and chicken broth. Simmer all of this for about 15 minutes. Continue to stir occasionally so the bottom doesn't burn. (Can you tell I've burnt it a couple of times??)
3) If you're going to freeze some, divide it now. If you're going to eat it, add the cilantro and lime juice. (Add this fresh the next time you serve it).
4) Serve with tortilla chips, cheese, sour cream, avocado, etc. to your liking.

Print this recipe

Read more...

Poppy Seed Chicken

This has become a famous dish at the Atkins household, passed down from Mama Omi. It is one of our favorites and never gets old. Actually, it was the first meal I made for Stuart when we were dating...awwwww...and now he can't get enough of it. If you're a picky eater, give this one a try. There are several variations of this recipe out there, perhaps you have your own. I love to make it when people join us for dinner. Easy. Yummy. Makes great leftovers.

This is Blake, Victoria, and Macey enjoying some PSC...they're pretty awesome. 


Ingredients
4-6 chicken breasts, cooked and cubed
1 can cream of mushroom soup
1 can cream of celery soup
8 ounces sour cream
1 stick melted butter
1-2 stacks Ritz crackers, crushed
1 stick of butter
2 Tbsp poppy seeds

Directions
Preheat oven to 350 F. After you cook and cut up the chicken, put it in the bottom of a 9x13 dish. Mix together soups and sour cream; spread on top of the chicken. Stir together the melted butter, crushed crackers, and poppy seeds. Spread that on top of the chicken. Bake at 350 for about 30 minutes, or until hot and bubbly.


Serve over hot rice and with some veggie sides. I usually like to make it with broccoli or green beans and a salad.  So what do you think? Do you have your own variation of this simple casserole? Let me know!

The best part about this meal....Stuart can make it too!! I'm so proud. 

Print this recipe

Read more...

Lisa's Filled Yeast Loaves

If you have company staying the night, and you want to make a seriously delicious breakfast...you gotta try these. "Lisa" is my Aunt Lisa--another great cook in my family. Her filled yeast loaves are a danish that will feed about 10 people. Remember to start it the night before, so that your bread will have time to rise. You'll also need to let the dough rise in the morning, so aim for a late breakfast. My friends and I spent the weekend at a cabin recently and I made these. It was a great start to a relaxing Saturday. Serve these with some fresh fruit and, as my mom likes to say, you'll be the hostess with mostest, guaranteed.


Bread 
8 ounces sour cream
1/2 cup sugar
1 teaspoon salt
1/2 cup melted butter
2 packages dry yeast
1/2 cup warm water
2 eggs, beaten
4 cups plain flour (might need 1/2 cup or more for altitude adjustment)

In a sauce pan, heat sour cream over low heat. Stir in sugar, salt and butter. Cool to lukewarm. Meanwhile, sprinkle the yeast over warm water and let dissolve, stir if needed. Add this to sour cream mixture and combine with beaten eggs and flour. Mix well. Cover tightly. Refrigerate overnight.

Filling
8 ounces cream cheese (room temperature, cut into chunks)
3/4 cup sugar
1 egg, beaten
1/8 teaspoon salt
2 teaspoons vanilla

Mix all of the above together. Take the dough out and divide into four equal parts. Roll each into a rectangle that measure approximately 12"x8".  Spread 1/4 of filling on each of the rectangles. Leave edges clear of filling. Roll into a jelly roll. Tuck ends under.

Place on cook sheet, seam side down. Repair any tares that may occur. Use a spatula and make angular slits across the top of each roll. Cover and let rise in a warm place until double in size (30min - an hour). Bake for 15 minutes, (until light brown) at 375 degrees.

Glaze
1 cup powdered sugar
1 teaspoon milk
1 teaspoon vanilla

Mix well in a small bowl. Pour over each roll after they bake. Serve immediately.

Read more...

The Best Thing Since Chopped Onions....

Let me just tell you that this little contraption has become my best friend in the kitchen. It definitely deserves a shout-out because I use it for almost every meal. If you're like me, and hate the thought of chopping up onions then you'll love the Progressive Onion Chopper. It does the job for you in less than a minute. No more getting all emotional over a stupid onion! Just cut the peel off, cut the onion in half, place it on the chopper...and you're done! It even has a measuring guide so you know how much you have. Brilliant I tell you! Here are some step-by-step pics of just how easy it is.

1) Peel the onion, and wish it farewell. 


2) Hi-yah! (this usually takes both hands...for me)

3) Open the top and marvel at how easy that was.

4) Measure and use! No tears allowed!

I use this for onions, peppers, celery, carrots, and whatever else needs to be chopped. It also comes with a lid-cleaning tool AND it's all dishwasher safe which makes for easy clean up! Just trying to share the love here...this thing is awesome!

Read more...

Blueberry Scones

This isn't the simplest recipe...but it is oh so good! My youngest sister was in town this weekend and we spent Saturday morning making these scones. It was definitely more fun to cook with her. She makes everything an adventure, and she is a great helper! So on your next free Saturday morning, get out your apron and rolling pin and get ready to impress yourself! (We took plenty of pictures during this endeavor...hopefully you enjoy them).


Blueberry Scones
2 sticks butter (frozen is best)
1 1/2 cups fresh blueberries (half a pint...put these in the freezer too)
1/2 cup whole milk
1/2 cup sour cream
2 cups unbleached all-purpose flour (we used bleached...oops)
--plus additional flour for work surface
1/2 cup sugar
--plus 1 tbsp to sprinkle on top
2 tsp baking powder
1/4 tsp salt
1 tsp grated lemon zest
Parchment paper

Alright here goes...
1. Adjust the oven rack to middle position and preheat oven to 425 degrees.  
2. Score and remove half the wrapper of each stick of butter. Grate unwrapped ends on large holes of box grater. You remove half of the wrapper so you can hold one end, but in total you should only grate one stick (8 tablespoons of butter). Melt 2 tablespoons of the ungrated butter and set aside. Save the remaining 6 tablespoons for another use.


3. Whisk together milk and sour cream in a medium bowl, refrigerate until needed. Whisk flour, 1/2 cup of sugar, baking powder, baking soda, salt, and lemon zest in a medium bowl. Add the grated butter to flour mixture and toss with fingers until thoroughly coated.


4. Add milk mixture to flour: fold with spatula until just combined. With rubber spatula, transfer dough to a work surface that has been liberally floured. Dust surface of dough with flour...with floured hands. (I warned you about the apron!) Knead dough 6 to 8 times, until it just holds together in ragged ball, adding flour as needed to prevent sticking.

5. Roll dough into approximate 12-inch square. Fold dough into thirds like a letter, use a metal spatula (or something similar) to release dough if it sticks to counter top.  Lift short ends of dough and fold into thirds again to form approximate 4-inch square. Transfer dough to plate lightly dusted with flour and chill in freezer for 5-10 minutes.

6. Transfer dough to floured work surface and roll into approximate 12-inch square again. Sprinkle blueberries evenly over surface of dough. (Note: if the blueberry container is a little difficult to open after being in the freezer...do not squeeze the box...or blueberries will fly ALL OVER THE FLOOR).


Don't worry, we didn't reuse these that hit the floor, although it crossed my mind. I snuck some of them in Elise's cereal the next day. HA!

At this point you'll see why it helps to freeze the blueberries first, since you have to press them into the dough.

Using your metal spatula, loosen the dough from the work surface and roll the dough, pressing to form a tight log. Lay seam-side down and press log into 12x4 inch rectangle.

Using a sharp, floured knife, cut the rectangle crosswise into 4 equal rectangles. Then cut each rectangle diagonally to form 2 triangles and transfer to parchment-lined baking sheet.


7. Brush tops with melted butter and sprinkle with remaining sugar. Bake until tops and bottoms are golden brown (about 18-25 minutes). Transfer to wire rack and let cool 10 minutes before serving. Serve with a fresh cup of coffee. Mmmmmmmmmm....

Read more...