Tres Leches Cake

Hola amigos. This recipe is from Sandre Lee, aka the cute matchy matchy lady. Koa and I were watching Food Network one day and she whipped this up at the end of her episode. Once I saw it, I knew I had to make it so I headed straight for the dairy section. Her meals are very economical and equally tasty, but this one is not so much on the skinny side. Tres Leches= Three Milks. Basically it's a good splurge dessert for when you get together with your friends (more specifically, your girlfriends on Monday nights)!

Ingredients
1 box Yellow Cake Mix
1 (12 oz) can evaporated milk (divided: 1 cup and remaining)
⅓ cup canola oil
1 (14 oz) can sweetened condensed milk
cups heavy cream (divided: 1 cup and ¼ cup)
½ tsp vanilla
½ cup toasted coconut (optional)


Directions 
1.  Preheat oven to 350°. Spray 9x13 dish with non-stick cooking spray. Place a medium glass mixing bowl in the freezer.
2.  In a large bowl combine the cake mix, 1 cup of the evaporated milk, oil, and eggs. Mix on medium speed for 2 minutes until smooth.


3.  Pour the batter into the pan and bake for about 30 minutes (until an inserted toothpick comes out clean). Let cool.
4.  In another bowl, whisk together (uno) the sweetened condensed milk, (dos) the remaining evaporated milk, and (tres) ¼ cup of cream. Notice...tres leches.


5. Once the cake has cooled for about 10 minutes (or more), use a fork to poke holes all over the cake. Go ahead, have at it.

6.  Pour the milk mixture evenly over the cake.

7.  Place cake in the fridge until the cake absorbs the liquid, at least one hour or overnight.

8.  When you are ready to serve, using the bowl from the freezer, combine the remaining cream and vanilla. Beat with an electric hand mixer on high speed until the cream holds soft peaks. You could also use whipped cream from the store but it is sweet and this topping is not. The cake is sweet enough you shouldn't need the added sweetness of cool whip.

9.  Spread the whipped cream over the cake and serve immediately (or serve a dollop of whip over each slice of cake). Garnish with toasted coconut.


Print this recipe

Read more...

Honey Peanut Butter Cookies

I usually don't consider anything that is not chocolate to be a dessert...but these cookies quite the exception. They are simple and so tasty. Do I say that about every recipe? Alright then, let's get to the goodness.


Ingredients
½ cup shortening
1 cup creamy peanut butter
1 cup honey
2 eggs lightly beaten
3 cups all-purpose flour
1 cup sugar
1½ teaspoon baking soda
1 teaspoon baking powder
½ teaspoon salt

Directions
1) Preheat oven to 350°. In a mixing bowl, mix shortening, peanut butter, and honey.  Add eggs and mix well.


2) In a separate bowl, combine flour, sugar, baking soda, baking powder, and salt.  Remember, measuring flour correctly can make or break your recipe. Too little flour and your baked goods will fall apart, too much flour, and they'll be super dense. Spoon your flour into the measuring cup until it is overflowing. Then use the back side of a knife to scrape off the excess. Don't pack it into the measuring cup. If you really want to be safe, it's always a good idea to sift it first (but I only do that when the recipes specifically calls for it).


3) Combine the dry mixture with the peanut butter mixture and mix well.

4) Roll dough into 1½ inch balls and place on an ungreased baking sheets, or use one of these handy little cookie scoops! Flatten cookies with a fork dipped in flour.


5) Bake at 350° for 8-10 minutes. Who says watched cookies never bake? OK, I don't think anyone says that actually, but look at this fun time lapse, courtesy of my hubby. Yield: 5 dozen delicious cookies.


Print this recipe

Read more...

Red Beans & Rice

Weather you're from the Big Easy or not, there is no better iconic dish of Louisana Creole cuisine than good ol' Red Beans and Rice. It has a little kick to it, makes plenty for leftovers, and is pretty simple overall. It does take about 2-3 hours to fully prepare, so ensure that you have enough time before dinner. Here is my mom's recipe, go try it for yourself and see how easy it is!

Ingredients
1 Tbsp oil
1 cup chopped onion
½ cup chopped celery
2 Tbsp minced garlic
8 ounces Kibalsa Smoked Sausage, cut into 1-inch slices
2 bay leaves
¼ tsp black pepper
1 tsp dried thyme
½ tsp cayenne pepper
1 tsp salt
1 ham hock
1 pound dry red beans
10 cups chicken stock
2 cups cooked white rice

Directions
1. Soak the red beans over night in luke-warm water covering about 2 inches above the beans.  Hint: You can also put the beans and water in a microwave safe bowl and microwave them for about 20 minutes. Same diff.


2. In a stock pot, saute the onions, celery, and garlic for 1 to 2 minutes. (Until the onions are translucent). Add the sausage, bay leaves, black pepper, thyme, cayenne, and salt. Saute for 1 more minute.

3. Add the ham hock and beans.  If you don't know what a ham hock is, just go to your local grocery store and ask the guy at the meat counter...try not to be alarmed if it looks a lot like a pig's foot.  If they're sold in packs of two, you can ask them to split it so you only have to buy one. Cover everything with chicken stock. Bring to a boil, but then turn the temp down to a simmer.


4. Cook the bean mixture for 2 hours or until beans are tender. Mash about 1/4 of the mixture against the side of the pot with a wooden spoon.  Re-season with salt and pepper if needed. Remove the ham hock and slice the meat off the bone to add back into the mixture.

5. To assemble, spoon warm rice into a bowl and ladle the bean mixture right over the top. Garnish with green onions, Essence, and crusty bread.


Print this recipe

Read more...

Noodles & Co. Mushroom Stroganoff

For everyone who lives here in Georgia, I feel very sorry for you, because we're all missing out on one of the greatest restaurants I know of.  It's called Noodles & Company, and no knock off version will ever be able to compete.  I miss it more every day, so whenever Stuart and I get the chance to go back to Colorado, that is always on my must-eat-there list. They have the most delicious pasta dishes and now even serve salads and sandwiches! (But I always stick to the noodles).  My top three favorite dishes are Penne Rosa, Pesto Cavatappi, and Mushroom Stroganoff.  While we were eating at their Breckenridge location last week it hit me....I could do this! Their recipes are not easily accessible to the general public, but with a little determination I was able to track down a pretty good replica of their Mushroom Stroganoff. (Sorry, Noodles, I wouldn't have to do this if you'd open a store or two in Atlanta).

There are two ways to make it: one with meat, one without. This time I opted vegetarian style (aka I forgot to pick up the meat at Publix). But click the "print this recipe" button down below for the full recipe with seared beef tips.

Ingredients
1 lb egg noodles (cooked al dente)
1 medium yellow onion (diced)
4 tsp jarred garlic (or 4 cloves fresh garlic, chopped)
2 pounds white mushrooms (although Noodles uses portobello so you pick your favorite)
1 cup cream
1 Tbsp. Canola oil
1/4 cup Sherry
1 tsp Kosher salt and cracked black pepper (to taste)
1 Tbsp. Olive oil
1 cup sour cream
1 Tbsp. Herbs de Provence
1 Tbsp. chopped parsley leaves
Shaved Asiago cheese

Directions
1. Cook pasta to al dente then chill in ice cold water. Drain, toss with olive oil, and set aside. (Nifty little trick, eh?)


2. Heat a large sautee pan. Add the canola oil and begin to sautee the onions.

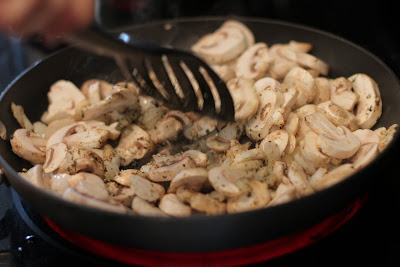
3. Add the garlic, Herbs de Provence and mushrooms. Stir well.
Disclaimer: I had never heard of Herbs de Provence so I went looking for a recipe to make this herb blend. However, I opened my spice cabinet, and there it was! Thanks to my mom for shopping with me! What would I do without her?


4. Deglaze the pan with the Sherry.  (Basically, just pour it around the edges, let it sit for a minute, then stir. This technique is more important when you cook the meat, but the Sherry adds good flavor to the whole dish).  Stir the pan and bring to a boil.

5.  Add cream and bring to a boil. Then add sour cream and salt and pepper to taste.

6.  Add the cooked pasta, toss to coat, pour into a platter.

7. Top with cheese and parsley...eat up while it's hot!


Thanks to this website for helping me!

Read more...

Easy Enchiladas

Yeah I know, enchiladas are never the simplest meal to make, but these are much easier than these that I made before! Plus, if you are home alone and invite a friend over for dinner, it makes for quite a lovely evening filled with enchilada sauce and cooking oil...but hey, at least you're not alone! Just make sure you have a couple aprons on hand.

This recipe came from my big sis, Dana. I'm not sure where it originated from but it sure is tasty. Kaylee, thanks for coming to hang out with me and Keystone!

Ingredients
1 whole rotisserie chicken, deboned
1 large can of enchilada sauce
1 small onion, minced
1 can sliced black olives
2 cups shredded Mexican-blend cheese
Uncooked corn tortillas (about 18)
¾ cup corn oil 
Salt

Other things you might need:
Apron, tongs, 9x13 dish, paper towels, a helper.

Directions
1. Preheat oven to 350°

2. Pour oil in a small frying pan over medium heat.

3. While the oil is heating, set out the chicken, cheese, onions and olives so you'll be ready to fill (insert kind friend helping you cook).

4. Pour the enchilada sauce in a small dish that you will dip the tortillas in before filling them. Also, put a paper towel or two on plate nearby.

5. Once the oil is heated (not a great idea to heat it on high...), place one tortilla in the pan. Let it fry for about 20 seconds, until it starts form big air bubbles, then flip it over for the same amount of time. Sprinkle some salt on top.
6. Carefully remove the tortilla and place it on the paper towel to absorb some of the excess oil. Then dip it in the enchilada sauce to lightly coat each side.

7. Place the tortilla in a 9x13 dish. Fill with chicken, a few olives, a few onions, and cheese. Roll enchilada style.

8. Repeat steps 5-7 until dish is full. (Remember, it's easier using team work! One person fries and dips, one person fills and rolls).

9. Pour remaining enchilada sauce over finished enchiladas. Top with cheese and olives (onions optional, but not at my house).

10. Cover with aluminum foil and bake until cheese is melted, about 15-20 minutes.

Top enchiladas with sour cream, guacamole, lettuce, or anything else you like.

Notice that we made one large dish with red enchilada sauce and a smaller one with green chili sauce just to try it out. They were both great! I think I'll make more of the green chili ones next time.

If you have any unused tortillas leftover, cut them into pizza slices and throw them back in the oil until crispy. Enjoy some home made tortilla chips!

Print this recipe

Read more...

Stuffed Border Burgers

If there's one thing I love any day of the week, it's a delicious cheeseburger. I used to smash some hamburger meat together with ketchup and BBQ sauce, as you'll see in this pathetic post. Boorrriinnggg. Finally, I tried the recipe in my mom's cookbook for these Stuffed Border Burgers...and I'll never turn back.

First thing you'll need is the Tex-Mex Secret Sauce (shhhhh!)
½ cup sour cream
⅓ cup ketchup
1 (4.5 oz) can chopped green chiles
1 Tbsp minced fresh cilantro

Stir together all ingredients in a small bowl (that you can put a lid on to save for later use). Cover and chill until ready to serve. Now you're ready to make the burgers.

Ingredients
1½ pounds ground beef
½ cup finely chopped onion
1 (4.24 oz) can chopped ripe olives, drained
2 Tbsp ketchup
1 tsp chili powder
1 tsp fajita seasoning (McCormick)
6 slices Monterrey Jack cheese with peppers
6 onion rolls, split and toasted
Tex-Mex Secret Sauce

Directions
1) Combine the first 6 ingredients. Shape mixture into 12 (4-inch) patties. Fold cheese slices into quarters; place cheese on 6 of the patties. Top remaining 6 patties, pressing to seal edges. (Notice my little helper...)


2) Grill, covered with grill lid, over medium-high heat (350º to 400º) for 4 to 5 minutes on each side or until done. Serve on rolls with Tex-Mex Secret Sauce and desired toppings.


Add some fresh grilled asparagus and Cowboy Baked Beans. I tried to be all professional and cut the burger in half to show you all of its deliciousness...fail. Sorry about the iPhone pics...it just didn't feel right being so formal with a fancy camera for this laid back meal....and I'm lazy.

Print this recipe

Read more...

Free PDF Tutorials from CakeJournal

Cake: beautiful and yummy. No party is complete without it, and trust me, I'm all about a good party! Alas, this is one area in my cookbook that I tend to skip over. My mom has a whole layout with delicious cake recipes, but I've only tried one...and notice, there is no blog post...yet. Here are the pages from my scrapbook cookbook:


I know that it has to be somewhere in my blood because all of these recipes come from family members. Maybe I'll get there someday.  In the meantime, let me just admire those who have this gift of confection perfection. My mom and aunt pointed me to this great website all about cakes. After browsing the CakeJournal for a while, dreaming big dreams, I read this post, graciously offering some free tutorials on cake/cookie decorating. All I have to do is tell people about it!  So here I am, encouraging all of you wanna be (or real life) cake artists to check out the CakeJournal.com! Maybe this is the kick-start that I need!

Oh and about the other fabulous bakers in my bloodline. Check it out:
Exhibit A: Coconut Cake made famous by Granny. Seriously, famous.

Exhibit B: My Aunt Lisa makes some awesome cakes, including the groom's cake at our wedding. All of Stu's groomsmen signed it!

Exhibit C: German Chocolate Cake. One of my mom's best. One of my many failures.

Read more...

Best. Brownies. Ever.

One of my favorite cooking shows is America's Test Kitchen. (I referenced it before in this post). For every recipe, they ask the question, what makes this dish GREAT? And then they search for the exact reason of it's greatness. For brownies, the greatness is the chewiness (duh). They did a taste test and more than half the participants chose the boxed brownie over the homemade brownie. Although the homemade brownie had a better chocolate taste, more people chose the chewy goodness box-mix as their favorite. Thus, they came up with the perfect recipe for the perfect homemade brownie. I had to give it a whirl. No better time to do this than when I'm stuck at home after ACL surgery! Fortunately my parents were there to help out. I was dressed for the occasion...I know, I look awesome.


There are a couple of "keys" to these chewy brownies. #1 Fat. It's important to have the right ratio of saturated : unsaturated fat. I'll leave it at that so we don't feel too guilty enjoying these treats.  #2 Chocolate.  Using different types of chocolate (cocoa, unsweetened and bittersweet) adds a rich and complex taste. Makes my mouth water just thinking about it. #3 Cool it.  Let the brownies cool completely before diving in. It's okay to do a little taste test though. 

Ingredients
½ cup Dutch-processed cocoa
1½ teaspoons instant espresso powder (optional)
½ cup plus 2 tablespoons boiling water
2 ounces unsweetened chocolate, chopped fine
½ cup plus 2 tablespoons vegetable oil
4 tablespoons (½ stick) unsalted butter, melted 
2 large eggs
2 egg yolks
2 teaspoons vanilla extract
2½ cups sugar
1¾ cups all-purpose flour 
¾ teaspoon salt
6 ounces bittersweet chocolate cut into ½ inch pieces


A few more notes about this recipe: when it says "½ cup plus 2 tablespoons boiling water", that means you're supposed to measure out ½ cup and then add 2 tablespoons to that (do the same with the oil).  That confused me when I first read it, I'm sure you got it though. Boil the water first and then measure it out.

Directions

1) Prep your pan.  Preheat the oven to 350°. Line a 9x13 inch baking pan with foil and spray lightly with cooking spray. 

2) Whisk the cocoa, espresso powder (I used instant coffee), and boiling water in a large bowl until smooth.

3) W-H-I-S-K. Add the unsweetened chocolate and whisk until the chocolate is melted. Whisk in the oil and melted butter. Add the eggs, egg yolks, and vanilla. Continue to whisk until smooth. Whisk in the sugar until fully incorporated. Add the flour and salt and mix with a rubber spatula until combined. Fold in the bittersweet chocolate pieces. 
 Finely chopped unsweetened chocolate.
Bittersweet chocolate (½ inch pieces)

4) Scrape the batter into the prepared pan and bake until a toothpick inserted halfway between the edge and center comes out with  just a few moist crumbles attached, about 30 to 35 minutes. 

5) Transfer the pan to a wire rack and cool for 1½ hours (yep, you'll need a heaping scoop of patience for this recipe!)  NOTE: If you're using a glass pan, let it sit for 10 minutes to cool and then pull the foil/brownies out of the pan so it won't continue to cook.  Then let it cool for another hour and 20 minutes.  I made the mistake of leaving them in the ban, which is why I don't have a great "after" picture...shame on me. 
 
This pictures comes from this website, but mine looked similar :-D Right.  

Thank you, ATK.  I love you. 

Read more...